

Can You Use Garden Lime To Fertilize Tomatos
I have been building raised garden beds for over five years, mainly to grow vegetables. I recently branched out to building ornamental beds.
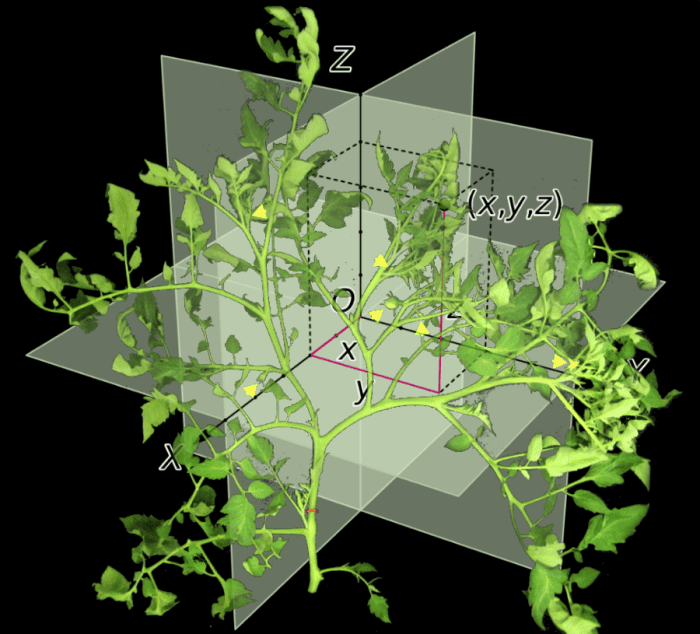
Picture of tomato plant branching in Euclidean space, derived by Robert Kernodle from various open source images.
What Is the Best Method of Supporting Tomato Plants?
At the time of writing this article in September 2014, I had grown tomatoes in a raised bed for two seasons. I had tried supporting the plants with stakes and with a well-planned string trellis. Both methods seemed to conflict with the natural growth pattern of tomato plants, and, therefore, both methods proved inadequate.
Stakes seemed to force vine growth into the ideal of a single vertical axis. A string trellis seemed to force vine growth into the ideal of a single flat plane. Tomato vines that branched outside the main axis or outside a flat plane seemed to require additional support.
The Problems With Stakes and String Trellises
When I used stakes, I found myself adding more stakes late in the growing season, outside the plane of the original stakes, in order to accommodate branches that did not fit the single-axis ideal.
When I used a string trellis, I found myself adding supplementary stakes outside the plane of the strings. I also discovered that vines of the type of tomatoes I grow stretched the strings (which were strong twine), sometimes breaking the twine. Tomato vines did NOT simply branch in the vertical direction of the twine as I had planned, but "chose" other directions of branching that deformed the twine beyond any real supporting configuration, even though I pulled the twine as tightly as possible. I found out the hard way that twine simply develops excessive give over time, under the continuous force of tomato vine growth and branching.
I am not sure how people who claim success with string trellises achieve such success. I suspect that these people are extremely vigilant in monitoring, pruning, and training their tomato vines. I believe that there is a less demanding, more enjoyable way.
My Solution: A Better Tomato Cage
My experience, therefore, tells me that tomato plants require a method of support that more freely accommodates vine branching on multiple axes and in multiple planes simultaneously. In other words, tomato plants seem to require a three-dimensional stake or a three-dimensional trellis to act as scaffolding on which you can secure branching vines, anywhere, spontaneously, as needed.
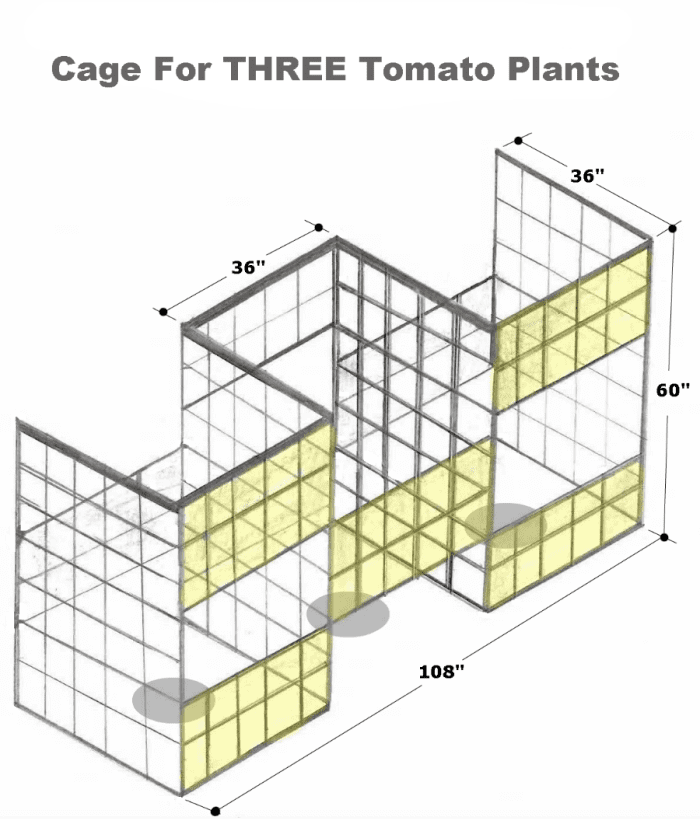
Drawing by Robert Kernodle of a homemade three-compartment tomato cage.
A strong, rigid cage around each tomato plant, thus, allows you to contain and secure branching vines that do not obey the ideals of the other methods. A cage allows for numerous potential points of support throughout the entire height and full thickness of each plant. It allows you more freedom to choose which branches mature and which branches disappear, without restricting you to the flatness of other methods.
This Type of Scaffolding Lets Your Tomatoes Grow a Little Wild
I see no reason to disallow a tomato vine branch from maturing, just because it fails to obey the flat ideals of traditional staking and trellising. As long as enough sunlight can reach the entire mass of foliage, I think that it is possible to better optimize the branch-number-to-fruit-productivity arrangement.
For example, if you are too late noticing a branching vine, then you can simply let the branch grow and bear fruit. If the cage by itself does not keep the resultant fruit off the ground, then you can insert a rod into openings of the wire mesh at a position that supports the fruit, or you can tie the branch onto one of the wires of the fence mesh to accomplish the same result. The point is you have scaffolding all around, all the time, ready to adapt to the plant's wild growth. Using a cage, you can prune in a full three dimensions instead of pruning close to two dimensions, as in staking or in wall trellising.
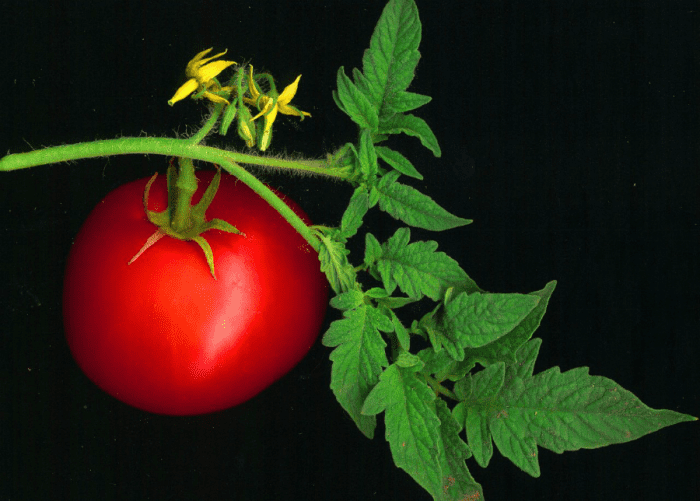
Picture of tomato fruit by David Besa from Creative Commons.
How to Make the Cage: General Instructions
Below are some DIY instructions for building this cage design. Please also consider the updated design further down in this article.
Materials and Tools
The main materials for building this three-compartment tomato cage are available at Lowe's:
- 1 – roll of fence wire, 5 feet by 50 feet, mesh size 2"x 4", $49.47 plus tax
- 12 – fence wire ties, pack of 30, $3.94 plus tax
- 1 – 8" bolt cutter or other suitable pliers, $12.98 plus tax
- 1 – 16 oz. rubber mallet or 12 oz. hammer, $4.98 plus tax
- 1 – straight 2"x 4" lumber, $2.96 plus tax
Read More From Dengarden
Two other materials you need are:
- 12 – twist ties from bread bags (free, if you save them)
- 6 – long sod staples, best made from wire coat hangers, under $2.00 for a pack of ten from Walmart
Construction Method
Make the cage on its side, and then sit it upright. The goal is to use a single, continuous piece of fence wire. No posts are necessary, because the fence wire is rigid enough to stand up on its own when folded as shown.
- Unroll the fence wire, and cut a piece twenty-one feet long, using the bolt cutter or pliers.
- On this 21-foot piece of fence wire, measure and mark 3-foot lengths (one after another along the entire length), using bread-bag twist ties to indicate the ends of six fold lines.
- Use your feet to brace the long straight edge of the 2" x 4" lumber along each fold line, as you begin each fold by pulling the fence wire towards you.
- Do the first two folds (1 and 2), flip over, do the second two folds (3 and 4), flip over, and do the final two folds (5 and 6), six folds, which will form three, three-sided compartments.
Each compartment accommodates one tomato plant. The whole structure accommodates three tomato plants, which is about what fits into a tomato garden plot measuring four feet by ten feet.
I will leave it to you to figure out the exact gymnastics of the folding maneuvers, since describing it in words appears too confusing. You might need the assistance of another person.

Rough drawing by Robert Kernodle, showing first two folds of six to make a 3-compartment tomato cage.
Optional Addition: Stabilizing Panels
You could stop here if you wished. If, however, you want extra stability for the structure and greater access to tomato fruits, then you might want to cut out three rectangular holes in the centers of the three closed sides of the upright structure, and add three rectangular panels at the centers of the three open sides of the upright structure.
To cut each access hole, just snip out a section the height of one four-inch mesh opening, and snip off dangling prongs above and below it, to give you a gap of one foot across the whole width of one compartment. If you want additional holes, then cut them where you think you might need them.
To add stabilizing panels:
- Cut ONE more piece of fence wire from your used roll, three feet long (the upright, standing width of each tomato cage compartment). You need ONLY this one additional piece of fencing to make all three stabilizing panels.
- Make each stabilizing panel the HEIGHT of three mesh openings, by going down three four-inch mesh openings, and cutting just below the HORIZONTAL wire that defines the opening, when the cage sits upright.
- Cut off dangling wires below this horizontal wire, to finish a panel.
- Repeat these steps until you have three stabilizing panels.
- Do NOT attach the stabilizing panels, until AFTER planting, to give yourself maximum freedom to work.
- When you DO attach stabilizing panels, do so with the fence wire ties bought on your supply list, and use ONLY a couple of twists to make stabilizing panels removable each growing season.
How to Use the Cage
- Prepare your garden plot for planting (i.e., full sun, dig/till, compost, fertilize, etc.)
- Position tomato cage on your prepared garden plot, with stabilizing panels NOT attached.
- Secure tomato cage to the ground, using long sod staples made from wire coat hangers.
- Position irrigation hose, if you use one, allowing space for one tomato plant per compartment.
- Water the garden plot before planting.
- Plant tomato plants, and mulch for best moisture retention and weed control.
- Attach stabilizing panels, if you choose to use these.
- Wait, watch, water, weed, and (hopefully) harvest in a couple months or so.
Updates to My Design
After writing this article, I made improvements to my original three-compartment, tomato cage design. While the original design works, I believe that my updated design offers additional advantages. The updated design involves a mere 90-degree flip of the central stabilizing panels, to make central supporting SHELVES instead.
Re-orienting the original, vertical stabilizing panels, along with increasing their dimensions, provides a matrix of holes radiating outward from the tomato plant's axis. This horizontal matrix at center height of the cage serves two functions:
- to introduce rectangular guide loops (similar to cloth ties on stakes) that contain and direct growing branches towards the vertical,
- to introduce a level, rigid, mesh shelf above ground level at all distances from the plant's axis that gives growing branches tabletop support.
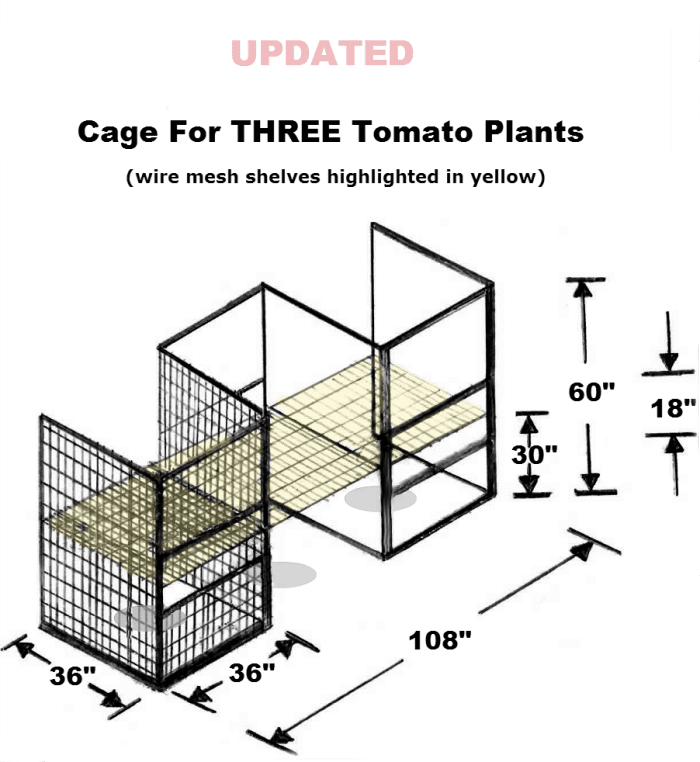
UPDATED drawing by Robert Kernodle of the homemade three-compartment tomato cage.
This updated design requires a little more fence wire, but since a 50-foot roll would be your supply source, you would have far more than enough fence wire for the job.
Each of the three wire-mesh shelves (highlighted in yellow) has dimensions of 36 inches by 36 inches. As with my original design, I suggest that you attach these additions using wire ties, in order to remove the shelves later, if you want to. Yes, you could cut the shelves larger, in such a way to create prongs that serve as attaching wires, but cutting the shelves cleanly and using softer wire ties provides greater ease of getting them on and off. If you do not mind permanent shelves, then, by all means, cut them for prongs. Watch out for the rigid, sharp ends, however, when you want to reach in past them later to pick ripe tomatoes.
Support Your Tomatoes and Enjoy Fresh, Homegrown Fruits
No matter how you might build this cage—as a plain 90-degree zigzag wall, or with central stabilizing panels, or with central support shelves, or with some other, personal modification—I wish you successful growing and good eating of a homegrown fruit that most store-bought versions can never equal.
Tomato Plant Support System Survey
This content is accurate and true to the best of the author's knowledge and is not meant to substitute for formal and individualized advice from a qualified professional.
Robert Kernodle (author) on September 16, 2014:
If readers can afford the $107 plus tax cost of a 150-foot roll of remesh (i.e., heavy gauge wire mesh used to reinforce concrete) with 6" mesh openings, then feel free to use this mesh instead of the less expensive smaller mesh that I suggest in the article.
In the article, I tried to show the least expensive option.
I might bite the bullet and buy the remesh, since the bigger wire mesh openings allow the most access with the least additional cutting of access holes.
The first drawing in the article looks more like remesh-sized wire, since I did not take pains to draw the openings with any accuracy there. The second drawing looks more like the smaller mesh, since I did try to draw the openings more to scale here.
Robert Kernodle (author) on September 08, 2014:
mactavers,
AFTER you read this hub, I added an UPDATE section, following the video.
mactavers on September 02, 2014:
Great ideas. Thank you.
Can You Use Garden Lime To Fertilize Tomatos
Source: https://dengarden.com/gardening/Best-Way-To-Support-Tomato-Plants-In-Your-Vegetable-Garden
Posted by: robinscomagese.blogspot.com
0 Response to "Can You Use Garden Lime To Fertilize Tomatos"
Post a Comment