

How To Make The Green Garden Path On A Gfg Quilt
Welcome to week two on our English Paper Piecing Basics Summer Series! This week is all about the humble hexagon! And in particular the much coveted Grandmothers Flower Garden quilt. In this special two-part post (because there's a lot of info!) I will guide you through the two methods to baste your hexagons. Hand sewing and the Sewline glue pen method. Part two is all about joining your shapes together and achieving a neat finish.
As I mentioned last week in our brief history of English Paper Piecing (EPP), the Grandmother's Flower Garden or Hexagon Flower Garden as it's sometimes known was hugely popular in the 1920's and 1930's, and it's not hard to understand why! They are truly beautiful! They can be dated back to the 1700's in England (known then as mosaic's or honeycomb patterns) and from what I've read on the subject the revival that came about in the 20s and 30s were much to do with the general Colonial revival in quilting at that time. There seemed to be a national wave of nostalgia in the U.S. at that time so the nations 'colonial' past was suddenly all the rage - and quilting heirlooms werein! So modern women of that time set about re-creating them.
If you are a regular reader of my blog you will know that I adore vintage and antique quilts, which inspires much of my quilting work. The GFG quilt is a shining example of the intricate, labour intensive sewing work many women did all those years ago. I particularly love this design because they are all so different; the endless colour combinations and ways the blocks can be set together makes each one completely unique. Couple that with some divine feedsack fabrics and you're on to a winner!

The GFG quilt above is most definitely in my top five favourite quilts of all time! Those bright colour's just pop against the white so well. Traditionally the centre's were often yellow, surrounded by a ring of solid colour and then pattern. Between the blocks there is often a single or double 'garden pathway', most often it was white or green but women creatively changed this up to suit them. I just love the flowers with the dark colour way below.


Below are some flowers I've made and others are from my vintage collection, which I was fortunate enough to win at auction a few years ago. I got a lot of pre-basted hexagons and cut fabrics ready for sewing! Feeling sufficiently inspired now? Good!

Have you got your supplies from last week ready? OK, great - let's get started!
Rotary Cutting Fabric For EPP
So, you want to know "how can I cut my hexie shapes quickly and easily?".
1. Firstly, fold the width of your fabric over. Take one of your selected hexagon shapes, and line it up 1/4" from the edge of the fabric.
2. Using a rotary cutter cut the fabric 1/4" from the side of the hexagon. You should now have one long strip.

3. Fold the strip in half again, you should have 4 layers of fabric. Using the hexagon paper template again, line it up on the fabric 1/4" away from the edge of the fabric - and begin cutting segments from the strip.
4. When you get to the end of the fabric strip, cut off the very edge - to lose the folds of fabric. Add this to your pile of 'rectangle' segments.

5. You can stop here if you wish, and baste the hexagons using it as is, or you can trim further. Using a small rotary cutting mat - place a stack of 4 fabric layers and rotary cut the edges to form the hexagon shape, turning the cutting mat as you go.
I use the ruler on one side and then judge by eye the seam allowance for the opposite side, and then repeat this for the other side. This allows for two less turns of the cutting mat - saving time. Also, this doesn't need to be a precise 1/4" seam allowance as with regular piecing, just remember to leave enough fabric for turning over.

Acrylic templates are a great way of cutting fabrics for EPP, they have the added seam allowance added for accurate cutting.
So now we have our fabric shapes cut, we can baste them! There are two ways to baste EPP shapes h and sewing or glue pen basting. I have done both, and I like to switch and change between methods personally, depending on my mood - and how organised I am. For instance if I'm going on a long car journey I won't bring my glue pen to baste as I find it's a little tricky on the move, so normally I would prep my hexies - glue basting them, sometimes though, I'm just not that organised so I'll sew en route which is totally fine with me. My diamond quilt I'm currently working on was all basted by hand. The Christmas stockings I made last year were made with the Sewline glue pen, as well as my current EPP project. Just find whatever suits you.
Hand Sewing Tutorial (The Corner Tack Method)
I love this method, I know there are lots of people that sew through the papers - but I find this way a lot quicker - there is no need to remove the basting stitches once the hexagons are joined together. The paper templates can be easily popped out, so they will last a lot longer and you also won't dull your needle by continually sewing through paper. Simple ;-)
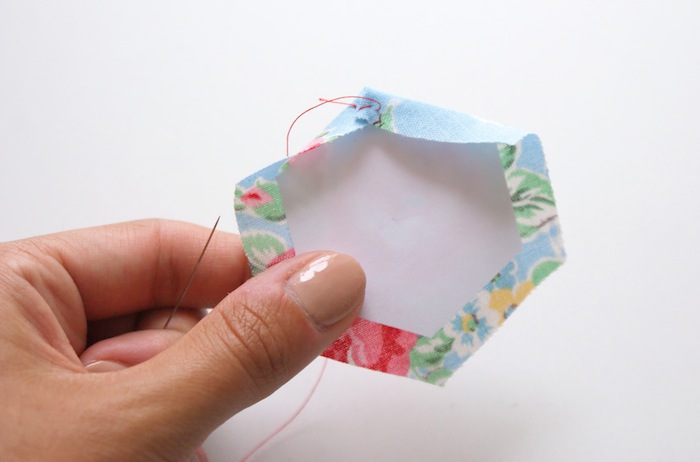
(Note: I am a leftie! Apologies to right-handed sewers - you would just start from the opposite way, beginning your first fold from the right hand side, instead of left as pictured. I am using a bright red thread for easy viewing, although you can use any thread colour for this part as it will not be seen from the front. Also, all images below are enlargable for close-up viewing!)
1. Thread your needle and knot at the end.

2. Place your paper template over your cut fabric shape, bend over the first side.

3. Fold over the next side and bring your needle down to catch that folded corner you've just made. Back-stitch through the fabric - not the paper template.
I like to think of this as the sewing equivalent of the "hospital corners" in bed-making. Remember those?! Well I use flat sheets on my bed on occasion and this method of folding and folding again for a neat and sharp finish is exactly the same principle.

4. From the starting point, sew through the fabric again.

Great, that's the first corner done!
5. Fold over the next side of fabric as before.

6. Needle in ... pull the thread ...

7. Needle in the starting point again, through the fabric and pull.

8. Fold the next corner over and repeat the basting technique until all edges have been folded and back-stitched.

9. Finish your work by repeating a couple of stitches to secure.
Glue Basting Tutorial (Sewline Glue Pen)
Next up, glue basting! Now this really is a quick way to baste a whole bunch of hexies, and I love it! People have asked me is it easy to remove the papers after. Yes, they are. Though if you're working with really tiny shapes it can get a little more difficult, to save time pulling out tacky papers you can use one of these paper-craft hole punches. Just punch a hole in each hexagon and you'll be able to pull out the papers no problem. It's also a good practise to do this for hand sewn basting too.

1. Glue down one side of the hexagon. Hold the glue pen between your fingers just as you would do a regular pen. Swiping the glue from the side, this way you won't put too much on.

2. Fold the next side over and glue.

3. Repeat for all sides of the shape. Note I don't let go of the glue pen, I keep it held in my hand. You'll whizz through this once you've got the knack.


See, wasn't that quick! The good thing is I find they last for aaaages too! You can buy the Sewline Glue Pens from Sew and Quilt, as well as the refills - which just click into place.
As this is a super long and, hopefully in-depth post on this section. I will do part two of joining the hexagons together tomorrow! And I know you're all dying to know who won the giveaway last week!? Congratulations Elizabeth Morden ! Please drop me an email with your address and I'll get your goodies sent out to you...

How To Make The Green Garden Path On A Gfg Quilt
Source: https://blog.sewandquilt.co.uk/2014/07/english-paper-piecing-basics-week-2.html
Posted by: robinscomagese.blogspot.com
0 Response to "How To Make The Green Garden Path On A Gfg Quilt"
Post a Comment