

How To Sharpen Garden Shears With Sandpaper
How to Sharpen Garden Tools
Instructions on how to sharpen hedge shears, pruning shears and grass clippers using simple tools.
 Family Handyman
Sharp tools make yard chores a lot faster and easier. This article shows how to sharpen your tools at home. You'll get the edge you need for pruning, clipping and shearing tools.
You might also like: TBD
- Time
- Complexity
- Cost
- An hour or less
- Beginner
- $51–100
Ingredients for a good cutting edge
Hedge shears and grass clippers
These blades can be sharp enough to easily handle yard tasks.
Pruning shears, hedge shears and grass clippers function in a similar manner. The two sharp surfaces of the blades come in contact at the base and cut all the way to the tips. They literally shear the grass and twigs from the stem of the plant with a scissors action. These two opposing surfaces are finely ground at the factory to the precise angle that makes them the most efficient.
When you resharpen these blades along the original bevel, you can get them so sharp that they'll easily cut tissue paper. The key is to sharpen exactly along this factory-cut bevel. I've seen many tools, now worthless, that were sharpened improperly because the person attempted to construct a "better cutting edge" or used the wrong tool to sharpen them.
Unless you're a pro, you shouldn't use a power grinding tool for sharpening. Buy a new mill file, 10 in. long for the best control. It works really well on hedge and pruning shears and even on grass clippers. If you find files confusing, read the package. It will tell you if the file's OK for use on garden tools. And if you don't want to use the same file on the grass clippers, read on—we'll show you how to sharpen them with an ordinary scissors sharpener.
Sharpen your hedge shears with a file
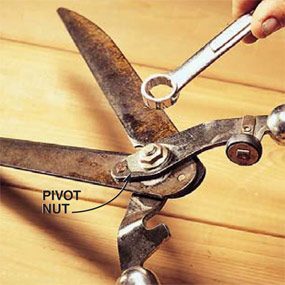
Photo 1: Tighten the pivot nut
Before sharpening, check the pivot nut. It could be loose, making the blades drift apart while cutting and tear the twig instead of cutting it cleanly. The nut should be snug with no play in the pivot. With the nut tightened, check the tool; if it cuts cleanly, it doesn't need sharpening. If it still cuts poorly, look down each blade to make sure it's not bent. If a blade is slightly bent, loosen the pivot nut and separate the blades. To straighten the blade, put it in a vise, slip on some thick leather gloves and tweak it until it's straight.

Photo 2: File the edge to expose clean metal
Clamp the blade firmly in a vise. Examine the factory edge. Hold the file with both hands and mimic the direction of the bevel like a golfer taking a practice putt. Now move the file in one broad stroke away from you along the entire cutting angle. To reiterate, move the file in one direction, away from you. Don't use small, jerky strokes or you'll lose the factory edge. As you work, you can see the clean metal path left by the file. Adjust your angle as needed to file the entire edge evenly. Repeat this motion several times until you expose clean metal over the whole edge. Usually it'll take only about 10 strokes. Do the same with the other blade.

Photo 3: Sand the back side of the blade
Place a sheet of 300-grit wet/dry sandpaper on a smooth, flat piece of plywood. You'll be able to feel the burrs (be careful—they're sharp) on the back side of each blade caused by the filing action. To remove them, lightly sand the back side of the blade. Keep the blade flat and move it in a circular motion. After making several circles, pick up the blade and gently feel the edge. When the burrs left by the file disappear, assemble the blades and lightly oil the moving parts with 3-In-One oil. Then try a test cut with the shears. They should cut better than ever.

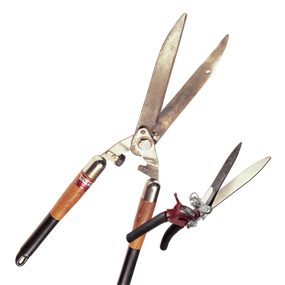
Hedge clippers
Use hedge clippers for cutting small diameter green wood. Thick branches and dry wood can bend the blades.
Hedge shears are perhaps the most abused garden tools. Because of their huge blades, it's tempting to use them as pruning shears. They're designed for cutting green wood only, no thicker than 3/8 in. Cutting thick branches or dried wood can stress the pivot nut and even bend the blades slightly.
Sharpening pruning shears demands a steady hand
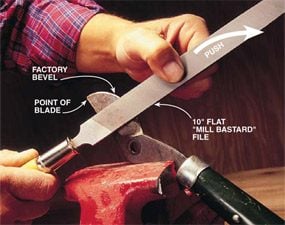
Photo 4: File along the factory bevel.
File the edge of the pruning blade using two hands. Start at the point and follow the curve of the factory bevel. Make one complete stroke from the point to the base of the blade. Apply light pressure in a direction away from you. Examine the edge after each stroke of the file to ensure you're following the path of the factory bevel. Once you've exposed fresh steel along a consistent curve, feel the back side for burrs. Sand the burrs away using the technique described in Photo 3.
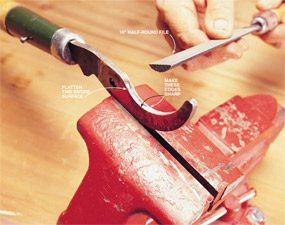
Photo 5: File the blunt blade so it's flat.
Using a smooth 10-in. half-round file, file the inside curve of the blunt blade perfectly flat. Use two hands for control. Make sure you hold the file exactly 90 degrees to the inside curve. Once this surface is flat, sand both side surfaces of the blade with 300-grit paper to get rid of any burrs.

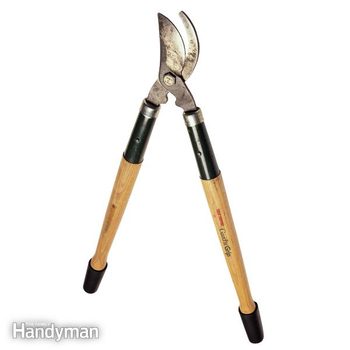
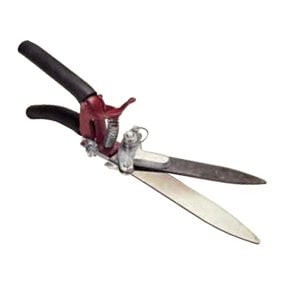
Pruning shears
Pruning shears are able to cut branches more than 1 in. thick.
This tool is by far the fussiest garden tool to sharpen. The principle is the same as for hedge shears, but filing along the curved blade (Photo 4) asks a great deal of your fine motor skills. The other half of the pruning shears (Photo 5) has a thick, blunt blade that the sharp curved blade cuts against. This heavier blunt blade is one reason this tool is able to cut branches more than 1 in. thick.
The blunt blade needs a crisp 90-degree edge. Think of the edge on a freshly cut piece of granite. Both the top and the side surfaces are flat, and where they meet you'll find a crisp, sharp edge.
Sharpen your grass clippers with a scissors sharpener

Photo 6: Pull the sharpener along the blade
If tightening the pivot nut and oiling the clippers failed to make your grass clippers cut better, remove the pivot nut. Separate the blades. Hold one of the blades on a wood block with the cutting edge up. Pull the scissors sharpener firmly from the base of the blade to the point. Be sure the carbide sharpening edge makes full contact with the factory bevel of the blade. This bevel is slight, not at all like that of a kitchen knife. Pull the scissors sharpener across the blade until the blade is sharp. Usually it takes about 10 passes. When you're finished with the first blade, do the same with the next.

Photo 7: Remove burrs with sandpaper
Sand the back side of the blade with 300-grit sandpaper. Move the blade in a circular motion until the burrs are gone, then do the same with the other blade. Reassemble the clippers and lightly oil the moving parts.
Note: Always feel the blade very gently with your hands to check sharpness. Burrs are often jagged and can easily cut your fingers.
Finally, always lightly oil your tools and wipe them with a dry cloth for the off-season.
Grass clippers
Clean your clippers after each use to keep them clean.
Because this tool is so close to the ground while clipping, it takes a lot of abuse. Soil can get between the blades and grind away at them each time you squeeze the handle. The moisture in the grass also can corrode them quickly. As you would with all trimming tools, wipe your grass clippers clean after each use and keep all the moving parts lightly oiled.
Required Tools for this Project
Have the necessary tools for this DIY project lined up before you start—you'll save time and frustration.
You'll also need these specialty tools: a 10-in. flat "mill bastard" file, 300-grit wet/dry sandpaper, 10-in. half-round file and a scissors sharpener.
Duct tape to tape the sandpaper to your work surface
Similar Projects
How To Sharpen Garden Shears With Sandpaper
Source: https://www.familyhandyman.com/project/how-to-sharpen-garden-tools/
Posted by: robinscomagese.blogspot.com
0 Response to "How To Sharpen Garden Shears With Sandpaper"
Post a Comment