

How To Make An Animation In Photoshop Cc 2018 Using Adobe Illustrator
Building frame-based animations
Although it is certainly possible to first with a video clip or even a photo when creating a frame-based blitheness, you may find such projects are better suited to shapes and text. You can certainly export a frame-based animation as a QuickTime video, but to mail service on your website, you're more likely to use Save for Web to generate an animated GIF. (Remember that the GIF file format uses a colour tabular array limited to no more than 256 colors, so it's not more often than not appropriate for photographic or other continuous-tone images.)Prior to generating the individual frames of your animation, you'll ordinarily want to create all of the elements from which those frames will be created. Keeping each element on a dissever layer makes frame creation a very simple procedure. Later you have all of the elements you'll need, open the Timeline panel through Photoshop'southward Window bill of fare and have a wait at the lower-left corner of the panel. If you see the give-and-take Once or Forever with a downward-pointing arrow to the right, you're ready to become started. If you lot meet a button with 3 little boxes lined upward horizontally like (ready for information technology?) frames in a picture show, click the button to switch the panel from video timeline to frame animation. (If, for another project, y'all need to reconfigure the Timeline console for video timeline, click the push in the lower-left corner.)
In a nutshell, hither'southward how you create a frame-based animation in Photoshop:
- Show/hibernate layers in the Layers panel. Set the Layer panel content to show those elements yous want visible in the first frame of the animation. If you want the animation to outset with an empty screen, hibernate all the layers.
- Click the New Frame push button. Below the frames in the Timeline panel are a number of buttons. The New Frame button is second from the right, next to the Trash icon (which is used, naturally enough, to delete frames).
- Rearrange the content of the Layers panel. Prove/hide layers, move layer content, and otherwise rearrange the paradigm window to fix it the mode you want for the second frame.
- Echo as desired. Click the New Frame button, rearrange the items, click the New Frame button, rearrange, and so on until you have all of the frames you desire for your animation.
- Apply Save for Web to create an animated GIF or export as a QuickTime movie. And you're done! (Make sure to save the layered document in the PSD file format, just in case yous want to brand changes or use some of the elements in some other blitheness downwards the route.)
How to create frame content
If each frame of the blitheness was identical, there would be no reason to create an animation — it would appear to be a withal epitome. So, from frame to frame, something is usually unlike to provide the alter-over-time that'south the footing for animation. Among the changes you tin can brand in the Layers panel to alter the advent of the animation from frame to frame are- Layer visibility: You tin prove or hide the content of a layer.
- Layer opacity: By changing a layer's opacity from frame to frame, you can make the content of the layer fade in or fade out as the animation plays.
- Change position: Yous can employ the Motility tool to elevate items effectually on a layer, making them seem to motility from frame to frame.
- Change blending mode: Changing a layer'due south blending mode changes the mode that layer'southward content interacts with the content of layers below from frame to frame.
- Add together, remove, or change a layer fashion: Consider, for case, a round shape with a Bevel layer fashion that changes, making the object announced to inflate and deflate from frame to frame.
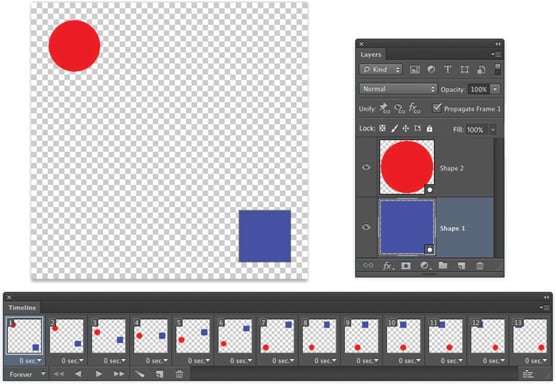 Over the grade of the blitheness, the red ball and blue square commutation places onscreen.
Tweening animation in Photoshop to create intermediary frames
To create the blitheness in the preceding figure, I actually created but 3 of the 13 frames. I let Photoshop do the other ten frames, saving me fourth dimension and ensuring that the animation would play smoothly and precisely. I created the beginning frame, with the ruby-red circle in the upper-left corner and the blue square in the lower-correct. I then clicked the New Frame push and, in the image window, dragged the ruby circumvolve to the lower-left and the blue square to the upper-right. After clicking the New Frame button again, I dragged the ruddy circumvolve to the lower-correct (where the blue square started) and dragged the blueish foursquare to the upper-left (where the red circle started).Subsequently creating my 3 frames, Photoshop tweened pairs of frames to create the intermediary frames. Tweening creates the frames in between two frames in the Timeline console. I clicked the first frame and then opened the Timeline panel bill of fare and selected the Tween control. In the Tween dialog box, you can specify how many frames to generate (I cull five), what aspects of the frames you want to blend (I needed to tween only for position considering there were no changes to opacity or layer styles), and whether to tween between the selected frame and the next frame or the last frame (I chose Next Frame). I and then clicked the 2nd frame I created (frame number 7 at that point, 2d from last) and repeated the Tween process.
 Photoshop generated ten of the 13 frames automatically.
Say that, on your home page, yous desire a logo to fade out and fade in repeatedly, and yous want each fade to be extremely smooth. Y'all could create the logo, ready the layer opacity to 100%, add a new frame, reduce the opacity to 99%, add together a new frame, reduce the opacity to 98%, and repeat over and over again until you reached 0% opacity. Or you could create the logo at 100% opacity, click the New Frame button, reduce the opacity to 0%, click the outset frame, and utilize the Tween command to generate 99 more frames, tweening for opacity. Add some other frame, return the opacity to 99% (your original starting time frame is at 100%), then tween 98 new frames between the second-to-concluding frame and the newly-created last frame. It'southward your choice.
Specifying frame rate
You control how fast (or slowly) your blitheness plays past specifying a frame rate. Generally, each frame plays for the aforementioned amount of time, so you lot can click the first frame, Shift+click the last, and select the frame rate of your choice from the menu below whatever ane of the frames. If you select No Delay (0.00 seconds), the animation plays as fast equally possible. Don't overlook the Other option! You're not restricted to the time delays listed in the menu. 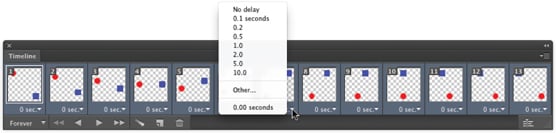 Select all of the frames and assign a frame rate to control playback speed.
Keep in mind that not all frames need to accept the same playback rate. There's no reason why a 100% opacity frame couldn't be set to a five- or 10-second delay, with all the other frames ready to 1/ten of a 2d.
In the lower-left corner of the Timeline console, y'all also want to select the echo for the blitheness. You tin can elect to have the animation play once then finish, to continuously loop (Forever), or you can choose whatsoever other number of times for the animation to play in a loop by selecting Other.
Optimize and save your animation
If you expect to be adding your animation to a spider web page or a presentation created in Keynote or PowerPoint, you desire to generate an animated GIF. (Keep in mind that if there's no layer named Groundwork in the Layers panel, your animated GIF can support transparency.) After generating all the frames, open up the Timeline panel card and select the Optimize Animation control. The default settings — with Bounding Box and Redundant Pixel Removal both selected — will generate the smallest file, ensuring the smoothest playback. Save the layered and animated file in the PSD file format for future utilise, and so choose File→ Save for Web to create the animated GIF. (Remember to select the Transparency option in Relieve for Spider web if you lot don't have a background layer.)If you want to use your animation with devices that don't play animated GIFs—a smartphone, for example — choose File → Export → Render Video to generate a QuickTime picture show.
About This Article
This commodity can be institute in the category:
- Photoshop ,
Source: https://www.dummies.com/article/technology/software/adobe-products/photoshop/how-to-make-animations-in-photoshop-284022/
Posted by: robinscomagese.blogspot.com
0 Response to "How To Make An Animation In Photoshop Cc 2018 Using Adobe Illustrator"
Post a Comment